DIY Prepper: In a world where uncertainty looms, the desire for self-reliance has ignited a movement of individuals seeking to take control of their own safety and well-being. The DIY prepper community embraces a hands-on approach, learning and practicing essential skills to navigate potential challenges, from food preservation and water purification to shelter construction and first aid. This movement is not just about stockpiling supplies; it’s about developing a mindset of preparedness and resilience, empowering individuals to face any situation with confidence and resourcefulness.
Table of Contents
The DIY prepper movement encompasses a wide range of individuals, from seasoned survivalists to families seeking to enhance their preparedness. Motivations vary, but a common thread runs through: a desire to be self-sufficient, to reduce dependence on external systems, and to be better equipped to handle unforeseen circumstances. The DIY approach emphasizes practicality and adaptability, using readily available resources and knowledge to create solutions that are both effective and affordable.
DIY Prepper Supplies and Resources

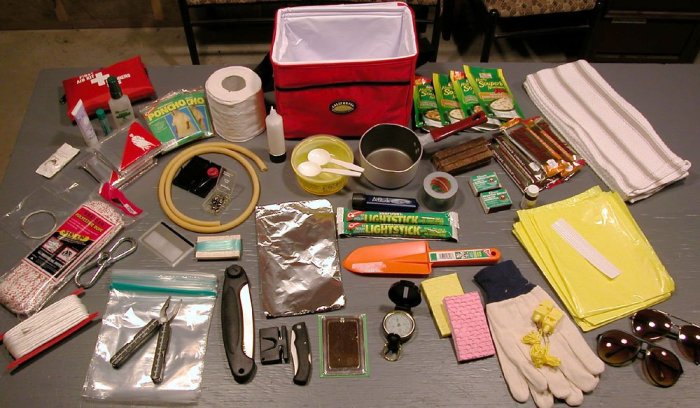
Building a DIY prepper kit can be both empowering and cost-effective. By focusing on essential supplies and utilizing readily available resources, you can create a robust preparedness plan without breaking the bank. This section explores essential DIY prepper supplies, their sourcing, and tips for maximizing budget and resource utilization.
Essential DIY Prepper Supplies
The essential supplies for DIY prepping can be categorized into several functional groups. This ensures a comprehensive approach to preparedness, addressing various needs and scenarios.
- Water: Water is fundamental for survival. Having a reliable source of clean drinking water is paramount. Consider options like water filtration systems, water purification tablets, and reusable water containers.
- Food: Non-perishable food items are essential for long-term sustenance. Stock up on canned goods, dried fruits, nuts, and other shelf-stable options.
- First Aid: A well-stocked first aid kit is crucial for addressing injuries and illnesses. Include bandages, antiseptic wipes, pain relievers, and other essential medical supplies.
- Shelter: Having a safe and secure shelter is essential in emergency situations. Consider investing in a tent, tarp, or other temporary shelter options.
- Lighting: Reliable lighting is essential for safety and visibility. Stock up on flashlights, lanterns, and extra batteries.
- Communication: Maintaining communication is crucial for receiving updates and coordinating with others. Consider a hand-crank weather radio, walkie-talkies, or a satellite phone.
- Tools: A basic set of tools can be invaluable for repairs, construction, and other tasks. Include a multi-tool, a knife, a hammer, and other essential tools.
- Personal Hygiene: Maintaining personal hygiene is essential for health and well-being. Include soap, hand sanitizer, and other hygiene products.
- Clothing: Pack warm and weather-appropriate clothing, including layers, rain gear, and sturdy footwear.
- Security: Personal safety is paramount. Consider a whistle, pepper spray, and other security measures.
Sourcing DIY Prepper Supplies
Sourcing DIY prepper supplies can be done through various channels, maximizing budget and resource utilization.
- Local Stores: Supermarkets, hardware stores, and pharmacies are readily accessible sources for many essential supplies. Look for sales and discounts to maximize your budget.
- Online Retailers: Online retailers offer a wide range of prepper supplies, often with competitive prices and convenient delivery options.
- Thrift Stores and Garage Sales: These outlets can be great sources for affordable prepper supplies, such as clothing, tools, and camping gear.
- Bartering and Trading: Bartering and trading skills can be valuable for acquiring supplies, especially in situations where cash is limited.
- DIY Projects: Many prepper supplies can be created using DIY methods, such as building a water filter, making fire starters, or sewing a first aid kit.
Maximizing Budget and Resource Utilization
Effective budgeting and resource utilization are essential for building a comprehensive DIY prepper kit.
- Prioritize Needs: Focus on acquiring the most essential supplies first, prioritizing those that address immediate survival needs.
- Shop Around: Compare prices at different stores and online retailers to find the best deals.
- Buy in Bulk: Purchasing supplies in bulk can often result in significant cost savings.
- Utilize Existing Resources: Make use of existing supplies and equipment, such as old clothes, empty containers, and unused tools.
- Learn DIY Skills: Developing DIY skills can help you create your own supplies and reduce reliance on purchased items.
DIY Prepper Projects

Creating DIY prepper projects can be a rewarding and practical way to enhance your preparedness. These projects allow you to build essential supplies and tools, ensuring you have what you need in an emergency.
Building a Solar Oven
A solar oven is an efficient and sustainable way to cook food using the power of the sun. It’s a simple project that can be constructed with readily available materials.
The design of a solar oven involves creating a box-like structure with a reflective surface to concentrate sunlight onto the food. Here’s a step-by-step guide to building a basic solar oven:
Materials:
- Cardboard box (large enough to hold your food)
- Aluminum foil
- Clear plastic wrap
- Black construction paper
- Scissors
- Tape
- Optional: Wooden frame for added stability
Steps:
- Cut and Shape: Cut a large rectangular opening on one side of the box. This will serve as the oven door. Cut another smaller rectangle on the opposite side of the box, near the bottom. This will be the air vent.
- Line with Aluminum Foil: Line the inside of the box, including the bottom, with aluminum foil. This will reflect sunlight onto the food.
- Create the Cooking Chamber: Cut a piece of black construction paper slightly smaller than the opening of the box. This will absorb sunlight and heat up the oven. Place it inside the box, behind the opening.
- Secure the Plastic Wrap: Cover the opening of the box with clear plastic wrap, securing it tightly with tape. This creates a greenhouse effect, trapping heat inside the oven.
- Place the Oven in Direct Sunlight: Position the oven in a sunny spot, with the opening facing the sun. Adjust the angle of the oven throughout the day to maximize sunlight exposure.
- Cook Your Food: Place your food on a baking sheet or in a heat-resistant container inside the oven. Monitor the cooking process and adjust the oven’s angle as needed.
A solar oven can reach temperatures up to 300 degrees Fahrenheit, depending on the intensity of sunlight and the design of the oven.
Constructing a Rainwater Collection System, Diy prepper
Collecting rainwater can provide a reliable source of clean water for drinking, washing, and gardening, especially during times of drought or water scarcity.
A basic rainwater collection system involves directing rainwater from your roof into a storage container. This system can be designed for small-scale use, such as watering plants, or for larger-scale applications, like providing drinking water.
Materials:
- Rain gutter
- Downpipe
- Rain barrel or other storage container
- Screen or filter
- Hose or pipe
- Tools: drill, saw, screws, sealant
Steps:
- Install the Rain Gutter: Install a rain gutter along the edge of your roof. Ensure the gutter is securely attached and has a slight slope to direct water towards the downpipe.
- Connect the Downpipe: Connect a downpipe to the gutter at a designated location where you want to collect rainwater. The downpipe should extend from the gutter to the rain barrel.
- Install a Screen or Filter: Attach a screen or filter to the end of the downpipe to prevent debris from entering the rain barrel. This helps maintain the quality of collected water.
- Position the Rain Barrel: Place the rain barrel beneath the downpipe, ensuring it’s level and stable. The barrel should be large enough to hold a sufficient amount of rainwater.
- Connect the Hose or Pipe: Connect a hose or pipe to the rain barrel for easy access to collected water. You can use this water for watering plants, washing dishes, or other purposes.
Rainwater collection systems are environmentally friendly and can reduce your reliance on municipal water supplies.
The DIY prepper community is a vibrant network of individuals united by a shared commitment to self-reliance and preparedness. Through collaboration and knowledge sharing, members learn from each other, refine their skills, and contribute to a collective understanding of resilience. Whether it’s building a solar oven, constructing a rainwater collection system, or mastering first aid techniques, the DIY prepper movement encourages individuals to take an active role in securing their own future, one practical skill at a time. As the world evolves, the principles of DIY prepping remain timeless: resourcefulness, adaptability, and the power of knowledge to navigate any challenge.
DIY prepping can encompass a wide range of skills, from gardening and food preservation to crafting and sewing. If you’re looking for a unique and humorous project, consider tackling a Lord Farquaad costume DIY. It’s a great way to practice your sewing and tailoring skills, and it’s sure to bring a smile to everyone’s face. After all, a little bit of fun and creativity can go a long way in any prepping endeavor.


