DIY paint car: a phrase that evokes both excitement and trepidation. The idea of transforming your vehicle with a fresh coat of paint is enticing, but the process can seem daunting. Fear not, for with careful planning and execution, you can achieve a stunning paint job that will turn heads and boost your car’s curb appeal.
Table of Contents
This guide will walk you through the essential steps of DIY car painting, from preparing your car and choosing the right paint to applying it with precision and achieving a flawless finish. We’ll cover everything from the basics of car paint to advanced techniques, troubleshooting tips, and alternative methods like vinyl wrapping and plasti-dipping.
Choosing the Right Paint
Choosing the right paint is a crucial step in a DIY car paint job. The paint you choose will affect the final look, durability, and longevity of your paint job. There are many factors to consider, including color, finish, and durability.
Color Selection
The color of your car paint is obviously a major consideration. You have the option of matching the original car color or choosing a custom paint shade. If you want to keep the car’s original look, matching the existing color is essential. This requires a color code, which can usually be found on a sticker under the hood or on the driver’s side door jamb.
If you want to change the car’s color, you can choose from a wide range of custom paint shades. You can find color charts online or at automotive paint stores. When selecting a custom color, consider the car’s style, your personal preferences, and the overall look you want to achieve.
Paint Finish
Paint finishes determine the final look and feel of your paint job. Here are the most common types:
- Gloss: This finish provides a shiny, reflective surface. It’s the most common finish for cars, offering a luxurious and modern look.
- Semi-gloss: This finish offers a less reflective surface than gloss, providing a more subdued look. It’s a good option for those who prefer a less flashy finish.
- Matte: This finish provides a flat, non-reflective surface. It’s a popular choice for vintage cars or those looking for a more understated look.
- Satin: This finish falls between semi-gloss and matte, offering a soft, velvety look. It’s a good option for those who want a more subtle shine.
Paint Durability
Paint durability is crucial for protecting your car’s body from the elements and wear and tear. There are two main types of paint systems: single-stage and multi-stage.
Single-Stage Paint
Single-stage paint is a simple, all-in-one paint system that combines color and clear coat in a single layer. This type of paint is relatively easy to apply and is a good option for budget-conscious DIYers. However, single-stage paint is less durable than multi-stage paint and may require more frequent touch-ups.
Multi-Stage Paint
Multi-stage paint systems consist of multiple layers, typically including a base coat, a clear coat, and sometimes a primer. This type of paint is more complex to apply but offers superior durability, protection, and a deeper, richer finish.
Multi-stage paint systems provide a more durable finish that resists scratches, fading, and other forms of damage.
Multi-stage paint systems are also more resistant to UV rays, which can cause paint to fade over time.
Applying the Paint
Now that you’ve chosen the right paint, it’s time to get your hands dirty! Applying paint to your car requires precision and patience. This section will guide you through the proper techniques for applying paint with a spray gun, ensuring a smooth and even finish.
Using a Spray Gun
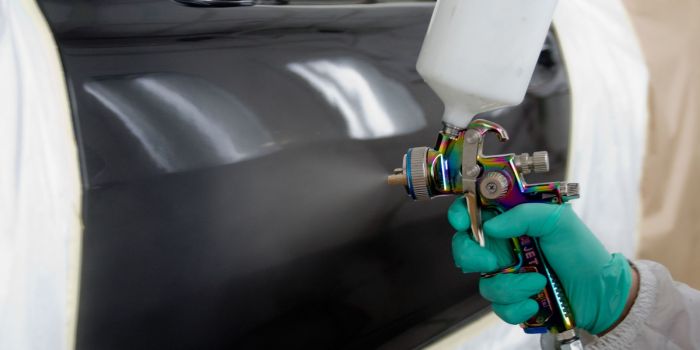
Using a spray gun is the most common and effective way to apply paint to a car. A spray gun allows you to apply a thin, even coat of paint, which is essential for a professional-looking finish. Here are some key steps and techniques to follow:
- Practice Makes Perfect: Before applying paint to your car, it’s crucial to practice on a scrap piece of metal or cardboard. This will help you get a feel for the spray gun and develop a consistent technique.
- Holding Distance: The distance between the spray gun and the surface you’re painting is critical. Generally, you should hold the gun about 6-8 inches away from the surface. This distance allows the paint to atomize properly and create a smooth, even finish.
- Spray Patterns: The spray pattern is also important. You should aim for a consistent, overlapping pattern, moving the gun in a smooth, even motion. Avoid stopping or starting abruptly, as this can lead to uneven coverage.
- Layering: Multiple thin coats of paint are better than one thick coat. This allows the paint to dry evenly and avoid runs or sags. Allow each coat to dry completely before applying the next.
Ventilation and Safety
Painting your car involves working with chemicals that can be harmful if not handled properly. It is crucial to prioritize ventilation and safety precautions during the painting process.
- Ventilation: Work in a well-ventilated area, preferably outdoors. If you must paint indoors, use a respirator mask and ensure proper ventilation.
- Safety Gear: Wear a respirator mask, gloves, and safety glasses to protect yourself from paint fumes and overspray.
- Fire Safety: Paint thinner and other flammable materials should be stored in a safe location away from any heat sources. Keep a fire extinguisher readily available.
Achieving a Smooth Finish
Achieving a smooth, even finish is the goal of any paint job. Here are some tips to help you avoid imperfections:
- Proper Preparation: A smooth finish starts with proper preparation. Make sure the surface is clean, free of dirt, grease, and rust. Sanding the surface before painting can help create a smooth, even base.
- Slow and Steady: Don’t rush the process. Take your time and apply the paint in thin, even coats. Allow each coat to dry completely before applying the next.
- Overlapping: Overlap each pass by about 50%. This ensures even coverage and prevents visible lines.
- Wet Sanding: If you notice any imperfections after the paint has dried, you can use wet sanding to smooth them out. Use fine-grit sandpaper and water to sand the surface gently.
Clear Coating and Finishing Touches: Diy Paint Car

The final step in a DIY paint job is applying a clear coat. This protective layer not only enhances the shine of your paint job but also safeguards it from the elements, UV rays, and scratches.
Types of Clear Coats, Diy paint car
Clear coats come in various types, each offering unique advantages:
- Single-Stage Clear Coat: This type combines the clear coat and color in one layer. It’s simpler to apply but may not offer the same level of durability and shine as a two-stage clear coat.
- Two-Stage Clear Coat: This type involves separate layers for color and clear coat. It offers superior durability, gloss, and depth of color. However, it requires more steps and careful application.
- Waterborne Clear Coat: This eco-friendly option is gaining popularity due to its low VOC content. It dries quickly and provides excellent protection.
- Acrylic Clear Coat: A common choice for DIY projects, acrylic clear coats offer a good balance of durability and ease of application.
- Urethane Clear Coat: These are known for their exceptional durability and resistance to chemicals and scratches. They are often used for professional applications.
Sanding and Polishing
After the clear coat has fully cured, you’ll need to sand and polish it to achieve a flawless finish. This process involves removing any imperfections, such as dust nibs or orange peel, and enhancing the gloss.
- Wet Sanding: Using progressively finer grit sandpaper, wet sanding removes imperfections and prepares the surface for polishing. Start with a coarser grit (e.g., 400 grit) to remove major imperfections and gradually work your way up to finer grits (e.g., 1000, 1500, 2000 grit) to achieve a smooth finish.
- Polishing: Polishing removes fine scratches and imperfections, enhancing the shine and gloss of the clear coat. Use a rotary or orbital polisher with appropriate polishing compounds and pads. Start with a coarser compound to remove deeper scratches and gradually move to finer compounds to achieve a high-gloss finish.
Common Mistakes and Troubleshooting
Even with careful preparation and technique, mistakes can happen when painting a car. Recognizing common errors and knowing how to troubleshoot them can save you time, effort, and money in the long run. This section will guide you through identifying common mistakes, addressing issues like runs, sags, and uneven coverage, and providing tips for correcting imperfections before they become major problems.
Identifying Common Mistakes
It’s important to be aware of common mistakes that DIY car painters often make. Recognizing these errors can help you avoid them and ensure a smoother painting process.
- Poor Surface Preparation: This is arguably the most common mistake. Inadequate sanding, improper cleaning, or failure to address existing rust or damage can lead to a poor paint finish that doesn’t adhere properly.
- Using the Wrong Paint: Choosing the wrong type of paint, like using an enamel paint for a car that requires a urethane paint, can lead to a less durable finish and potential problems with adhesion and longevity.
- Applying Too Much Paint: Over-application can result in runs, sags, and uneven coverage. It’s crucial to apply thin, even coats of paint, allowing sufficient drying time between each coat.
- Not Using Enough Coats: Applying too few coats can lead to an uneven finish, revealing the underlying color or primer.
- Inadequate Drying Time: Rushing the drying process between coats can lead to paint defects, such as cracking, peeling, or poor adhesion. Always follow the manufacturer’s recommended drying times.
- Incorrect Spray Technique: Holding the spray gun too close or too far from the surface, using an inconsistent spray pattern, or applying too much pressure can lead to uneven coverage, runs, and overspray.
Troubleshooting Paint Issues
Even experienced painters encounter issues during the process. Knowing how to troubleshoot these problems can help you salvage your project and achieve a professional-looking finish.
Runs and Sags
Runs and sags are common paint defects that occur when too much paint is applied or when the paint is applied too thickly. They appear as streaks or drips of paint that run down the surface.
- Prevention: Apply thin, even coats of paint, allowing sufficient drying time between each coat.
- Repair: If you encounter runs or sags, you can try to smooth them out with a wet sanding technique. Use a fine-grit sandpaper and water to gently sand down the runs or sags until they are flush with the surrounding paint.
Uneven Coverage
Uneven coverage can be caused by a variety of factors, including poor preparation, incorrect spray technique, or using too little paint.
- Prevention: Ensure the surface is properly prepared, use the correct spray technique, and apply enough coats of paint.
- Repair: If you notice uneven coverage, you can try to correct it by applying additional coats of paint. Ensure the paint is thinned to the correct consistency and apply it in thin, even coats.
Minor Imperfections
Even with careful preparation and application, minor imperfections may occur. These can include dust nibs, orange peel, or minor scratches.
- Prevention: Work in a clean environment, use a quality paint filter, and avoid sanding too aggressively.
- Repair: Dust nibs can be removed with a fine-grit sandpaper. Orange peel can be smoothed out with wet sanding techniques. Minor scratches can be repaired with a touch-up pen or by applying a thin layer of paint and sanding it smooth.
Alternatives to Traditional Painting

Traditional car painting isn’t the only way to give your vehicle a fresh look. Several alternative methods offer advantages and disadvantages, each with its own unique appeal. Let’s delve into some popular options, exploring their pros and cons, and how they stack up against conventional painting.
Vinyl Wrapping
Vinyl wrapping is a popular alternative to traditional car painting. It involves applying a thin, adhesive vinyl film to the car’s exterior. This film comes in various colors, finishes, and patterns, offering endless customization possibilities.
Vinyl wrapping offers several advantages:
- Cost-effective: Vinyl wrapping is generally cheaper than traditional painting, especially for larger jobs like full-body wraps.
- Easy removal: Unlike paint, vinyl wraps can be easily removed without damaging the underlying paint. This makes it a good option for those who want to change their car’s look frequently.
- Protection: Vinyl wraps provide a protective layer against scratches, chips, and UV damage.
- Wide range of options: Vinyl wraps come in a vast array of colors, finishes, and patterns, including matte, gloss, metallic, carbon fiber, and even camouflage.
However, vinyl wrapping also has some drawbacks:
- Durability: Vinyl wraps are not as durable as paint and can be prone to tearing or peeling, especially if not properly installed.
- Appearance: Vinyl wraps can sometimes show seams or bubbles, especially on complex curves. Professional installation is crucial to achieve a flawless finish.
- Cost of removal: While vinyl wraps are relatively easy to remove, professional removal is recommended to avoid damaging the underlying paint. This can add to the overall cost.
Plasti-Dipping
Plasti-Dip is a rubberized coating that can be applied to a car’s exterior. It comes in a spray can and can be easily applied by anyone with basic DIY skills.
Plasti-Dip offers several advantages:
- Affordable: Plasti-Dip is one of the most affordable ways to change your car’s appearance.
- Easy application: Plasti-Dip is easy to apply, even for beginners. It can be sprayed on in multiple thin coats to achieve a smooth finish.
- Protection: Plasti-Dip provides a protective layer against scratches, chips, and UV damage.
- Removable: Plasti-Dip can be easily peeled off, allowing you to change your car’s look whenever you want.
However, Plasti-Dip also has some drawbacks:
- Durability: Plasti-Dip is not as durable as paint or vinyl wraps and can be prone to chipping or peeling, especially in areas that receive heavy wear and tear.
- Appearance: Plasti-Dip has a matte finish and can look uneven or textured if not applied properly. It also doesn’t offer the same level of gloss or color depth as paint or vinyl wraps.
- Limited color options: Plasti-Dip comes in a limited range of colors compared to paint or vinyl wraps.
Whether you’re looking to refresh your car’s look, customize it to your liking, or simply save money on a professional paint job, DIY car painting can be a rewarding and fulfilling experience. With the right tools, knowledge, and a little patience, you can transform your vehicle into a masterpiece that reflects your unique style and personality.
Painting a car yourself can be a fun and rewarding project, but it requires careful planning and preparation. You’ll need to choose the right paint and primer, as well as invest in some basic tools and equipment. Similar to building an indoor DIY rabbit cage , you’ll want to ensure a clean and dust-free environment for optimal results.
Once you’ve got your workspace ready, you can start prepping the car for painting, making sure to mask off any areas you don’t want to paint. With a little time and effort, you can achieve a professional-looking finish on your car.


